How Do I Stake (Nominate) on Polkadot?
Related concepts
For the underlying concepts, see Staking.
IMPORTANT
Polkadot Developer Interface is a web wallet meant for power users and developers. For everyday use, there are several user-friendly wallets that support a plethora of features and platforms. Discover them in this article.
Nominators help secure the network by bonding their DOT and selecting validators they deem trustworthy to produce blocks. If you want to learn more about the benefits and risks of being a nominator, you can check this article.
What to know before starting
- Nominating currently requires a minimum of 250 DOT staked funds on Polkadot(0.1 KSM on Kusama). Please ensure you're above that minimum, or you won't be able to nominate.
IMPORTANT
Not all nominators with over 250 DOT will get staking rewards. The minimum amount needed to earn rewards is dynamic and can be found on the Targets page on Polkadot Developer Interface. Please refer to this referendum for details.
- If you are staking above the dynamic minimum amount and still aren't receiving rewards , it's possible that your account needs to be re-adjusted by calling an extrinsic. This is due to the new bags-list feature. You can find instructions on how to fix this here.
- If you don't have enough DOT to earn rewards, consider joining a nomination pool instead of staking solo.
How to stake using the Polkadot Developer Interface
GOOD TO KNOW
Controller accounts have been removed from staking. Staking now uses your stash account together with an optional staking proxy. If you don't want to use your stash account often, you can create a staking proxy which can perform all staking actions on its behalf, giving you added flexibility.
Check out the article on creating a proxy account for more information.
You can nominate validators (also known as "staking") on Polkadot Developer Interface using these steps:
1. Create a Polkadot account if you don't have one yet:
How to Create a Polkadot Account
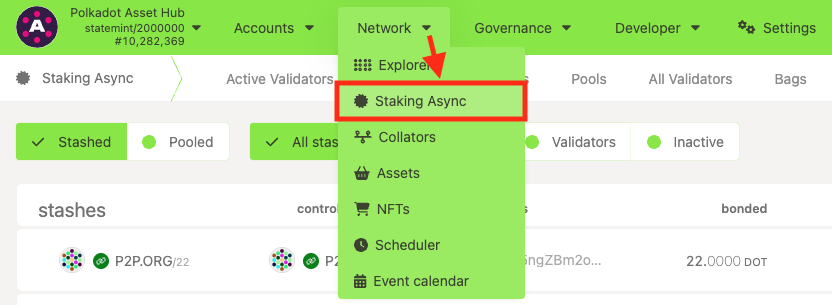
2. "Navigate to Network" > "Staking Async" > "Accounts" page on Polkadot Developer Interface:
3. Click on the "+ Nominator" button on the top right.
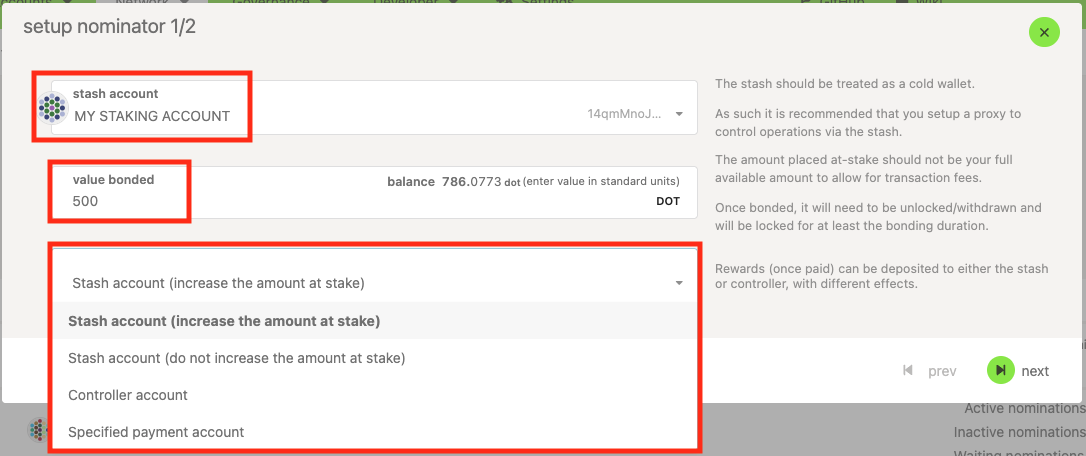
4. Choose your Stash account from the drop-down menu.
5. Select the amount you want to bond. Make sure you leave a small amount of DOT transferrable in both the stash and the staking proxy. You'll need some transferrable funds to pay transaction fees when changing your nominations, bonding more, or unbonding.
6. Choose your reward destination. You can auto-compound your staking rewards (increasing the amount at stake), send them to your stash account as free balance, or send them to any other account.
READ THIS FIRST!
Make sure that you have**at least 0.01 DOT** in the account that you are directing your staking rewards to. If you receive rewards of less than 0.01 DOT and they're sent to an empty account, you'll lose them. This has to do with the existential deposit on Polkadot.
7. Click "Next." Now, you need to select your validators. Please ensure you've read the article on choosing your validators. You can nominate up to 16 validators on both Polkadot and Kusama. Nominating more trustworthy validators increases your chance to earn rewards consistently.
8. Once you're done, click "Bond & Nominate." Review the transaction and click "Sign and submit" to finish the process.
That's it. You'll begin earning rewards after the next era or the era after that, depending on the timing of your nominations.